Publisher: Inscripta AI | Version 1.0 | Platform: Windows, macOS, Web (Microsoft 365)
New to NorgAI? Start with the Quick Start Guide for a 6-step walkthrough, then return here for the full reference.
Contents
- Overview
- Prerequisites & Installation
- Signing In
- Projects
- Uploading Documents
- Generating a Presentation
- Adapting an Existing Presentation
- The Plan Review Workflow
- Modifying Individual Slides
- Asking Questions About Your Documents
- Source Attribution
- Knowledge & Memory
- Project Collaboration
- Troubleshooting
- FAQ
- Privacy & Data Handling
- Support & Contact
1. Overview
NorgAI is an AI assistant built into Microsoft PowerPoint as a task pane add-in. It connects the documents your team uploads—RFPs, case studies, product sheets, market research, meeting notes—to the presentations you create, so every deck is grounded in real, verifiable information rather than generic AI-generated content.
How it works:
- You upload reference documents into a project.
- NorgAI indexes the content and makes it available to the AI.
- You describe what you want in plain English.
- NorgAI generates a plan, you review and approve it, and the deck is built inside your open PowerPoint file.
- Every claim in the output is traced back to the document or web source that informed it.
What it is not: NorgAI is not a general-purpose AI chatbot. It is scoped to the documents you upload. If the information is not in your project, NorgAI will tell you—or supplement with web search when appropriate, with full attribution.
2. Prerequisites & Installation
System Requirements
| Requirement | Detail |
|---|---|
| Office version | Microsoft 365 or Office 2016+ (desktop or web) |
| Supported hosts | Microsoft PowerPoint (Desktop—Windows & macOS; Web) |
| Internet connection | Required at all times—NorgAI is cloud-connected |
| Account | Create a free account on the NorgAI login page |
Installing the Add-in
NorgAI is available on Microsoft AppSource and can be installed by any user directly.
- Open Microsoft PowerPoint .
- Click Home on the ribbon.
- Click Add-ins .
- In the Office Add-ins store, search for NorgAI .
- Click Add .
- The Norg AI Tools group appears in your Home tab.
Opening the Add-in
- Open Microsoft PowerPoint .
- On the Home tab, locate the Norg AI Tools group.
- Click Norg AI .
If you do not see the Norg AI Tools group, click Insert → Add-ins → search for NorgAI → click Add . The button appears in your Home tab after installation.
The task pane opens on the right side of your PowerPoint window.
Auto-open: After first use, NorgAI sets itself to open automatically every time you launch PowerPoint. This behaviour can be cleared by reinstalling the add-in.
3. Signing In
Authentication
NorgAI uses secure authentication to protect your account. You can sign up directly on the NorgAI login screen—no prior setup needed.

- When the task pane opens for the first time, you see the NorgAI sign-in screen with a Login button.
- Click Login .
- A secure authentication dialog opens in a separate popup window within PowerPoint. The task pane itself does not navigate away.
- Sign in with your existing NorgAI account, or click Sign Up to create a new one.
- Once authentication succeeds, the dialog closes automatically.
- The NorgAI home screen loads in the task pane.
Session Management
- Your session persists on your device until you explicitly log out.
- If the session expires due to inactivity, the sign-in screen reappears—click Login to re-authenticate.
- To log out: click the user icon in the top-right corner of the task pane and select Logout .
Account Issues
For password resets or login problems, use the forgot-password option on the sign-in screen or contact NorgAI support at sales@inscripta.ai .
4. Projects
What is a Project?
A project is an isolated knowledge space scoped to one client, opportunity or engagement. Each project maintains:
- Its own document library —uploaded files are accessible only within the project.
- Its own conversation history —chat context is per-project and persists across sessions within a project.
- Its own AI memory —learned facts and preferences specific to that client or topic.
Projects prevent information from one client leaking into another’s outputs. Create a separate project for every distinct engagement.
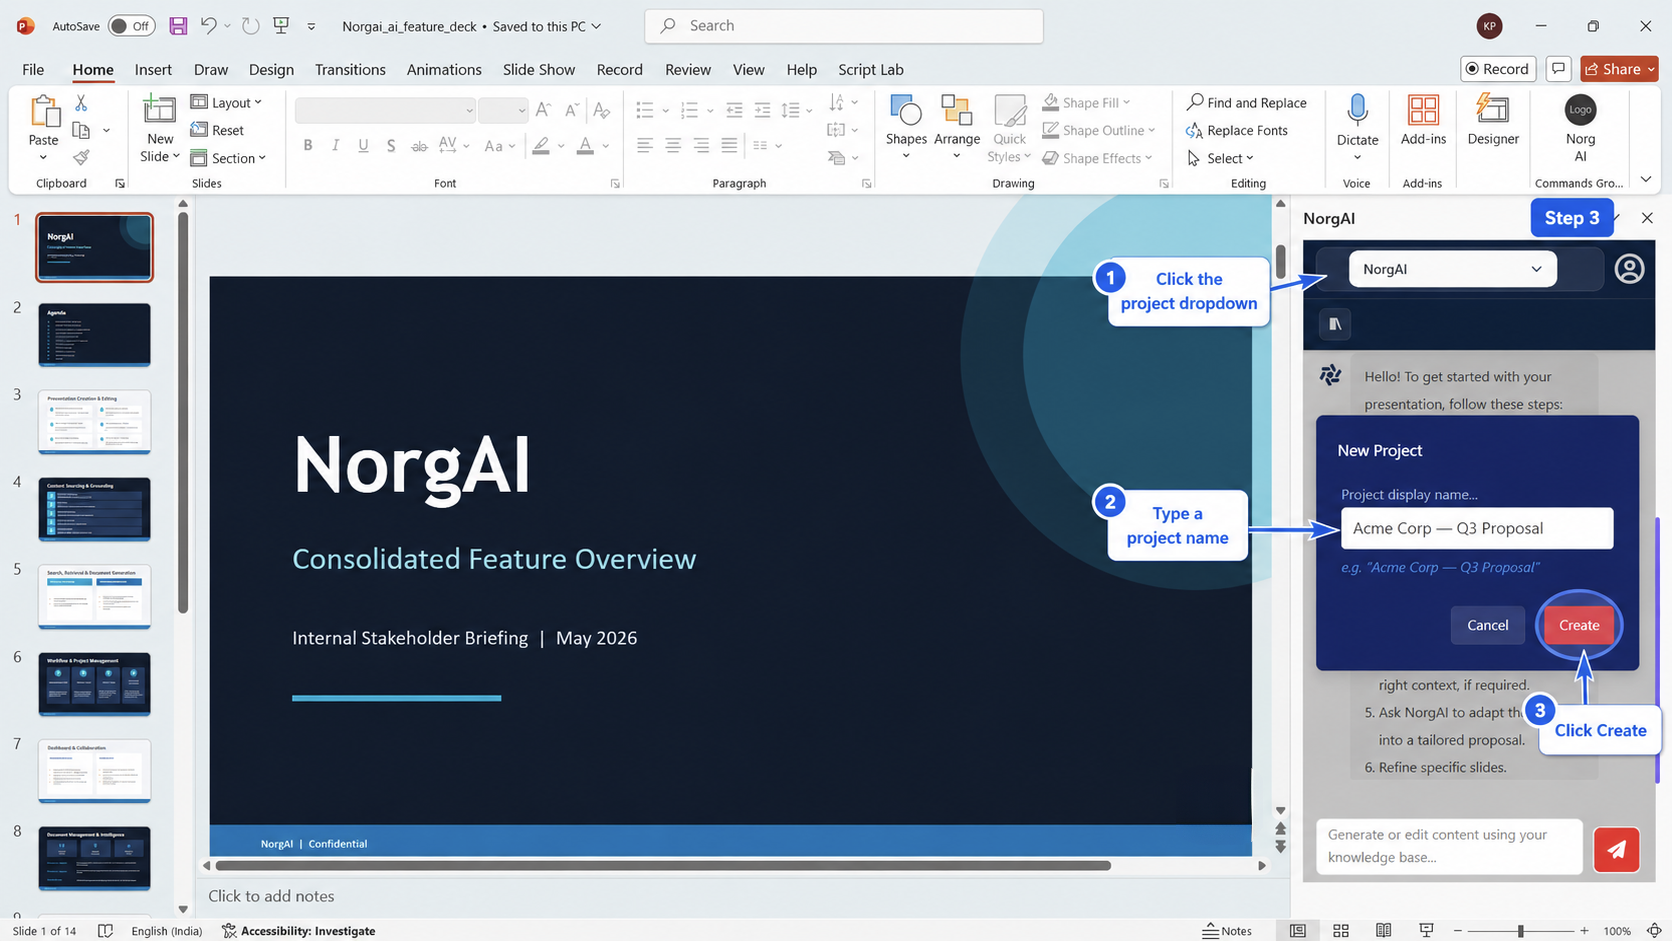
Creating a Project
- Click the project dropdown at the top-left of the task pane header.
- If no projects exist, the New Project dialog opens automatically.
- If projects exist, click Add Project at the bottom of the dropdown list.
- Type a project name. Recommended conventions: Acme Corp — Q3 Transformation Proposal , Digital Banking RFP — Response 2025 .
- Click Create or press Enter .
Switching Projects
Click the project dropdown and select a different project. The task pane reloads with that project’s document library and conversation history. Your previous project’s context is preserved and resumes when you switch back.
Deleting a Project
Hover over a project name in the dropdown and click the delete icon. Confirm in the dialog. This action is permanent —all documents, conversation history and AI memory for that project are deleted.
5. Uploading Documents
Documents are the foundation of every NorgAI output. The quality and relevance of what you upload directly determines the quality of what NorgAI generates.
Accessing the Document Panel
Click the Documents icon in the task pane toolbar (the library icon below the project dropdown). The document management panel opens with the Local Documents tab active.
Uploading Local Files
Drag and drop files onto the upload area, or click browse files to open a file picker.
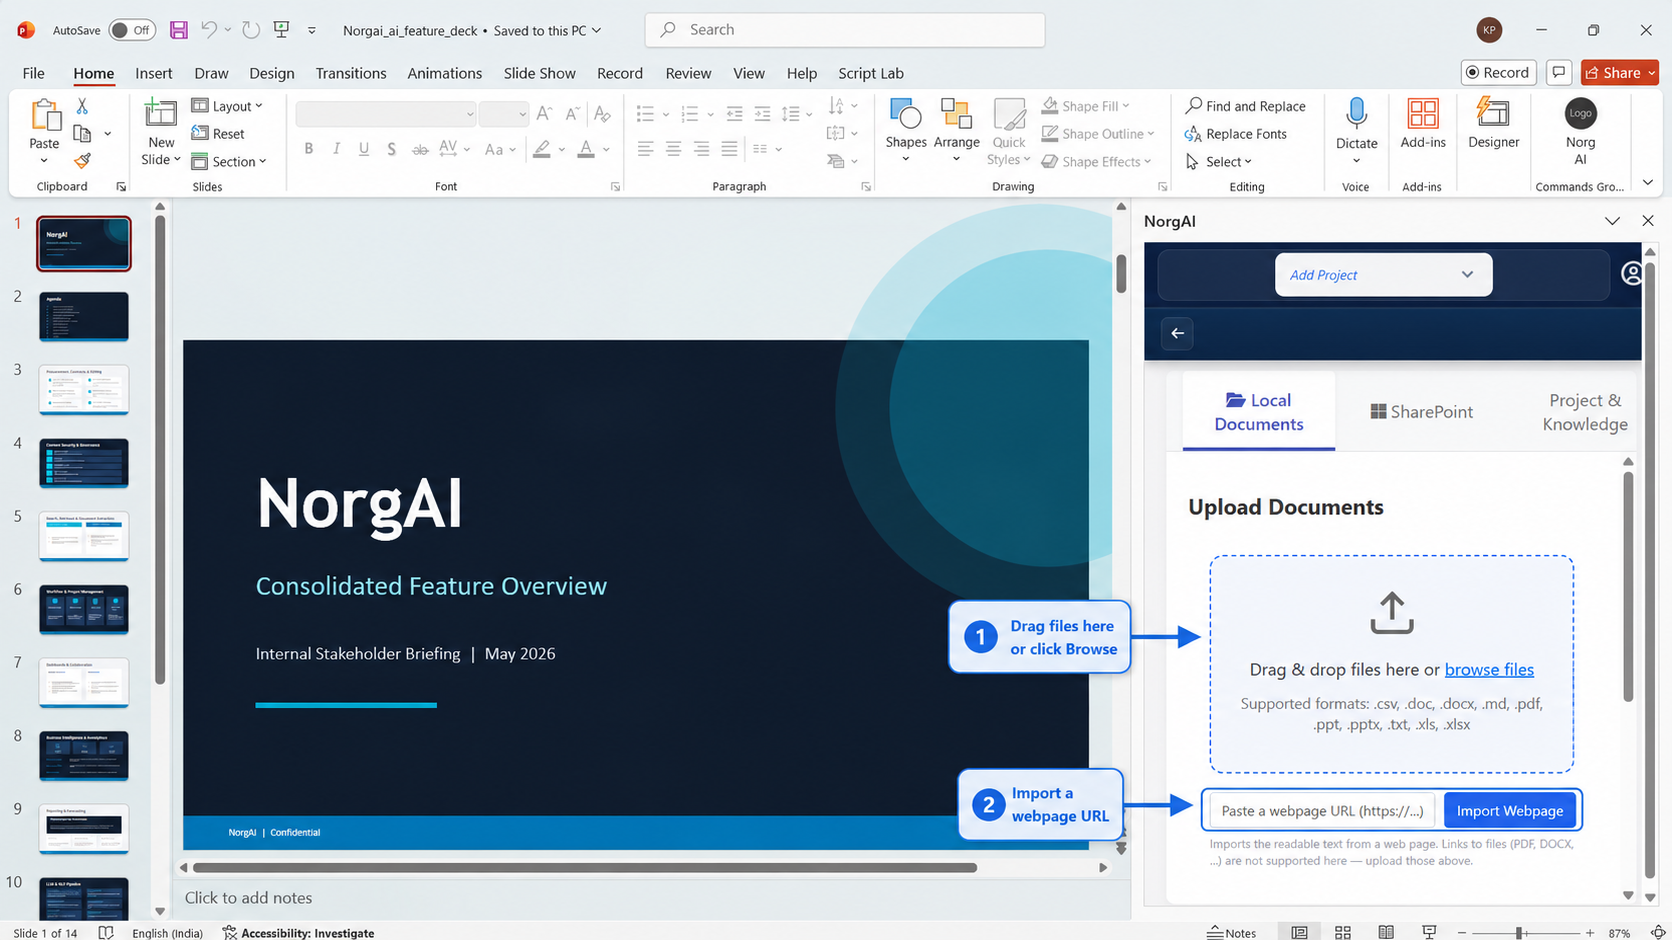
| Format | Extension |
|---|---|
| Microsoft Word | .doc, .docx |
| Microsoft PowerPoint | .ppt, .pptx |
| Microsoft Excel | .xls, .xlsx |
| CSV | .csv |
| Plain Text | .txt |
| Markdown | .md |
Multiple files can be uploaded simultaneously. Each file is processed independently.
Importing from a Web URL
Below the upload area is a field labelled Paste a webpage URL . Enter any public webpage URL and click Import Webpage . NorgAI extracts the readable text from that page and adds it to your project as a document source.
Note: URL import captures text content only. PDFs or documents linked within a page must be downloaded and uploaded separately.
Processing Stages
| Status | What is happening |
|---|---|
| Uploading | File is being transferred to the NorgAI server |
| Parsing | File content is being read and structured |
| Indexing | Content is being converted into AI-searchable vector format |
| Fully Processed | File is ready—NorgAI can draw on it |
| Failed | Processing error—delete the file and re-upload |
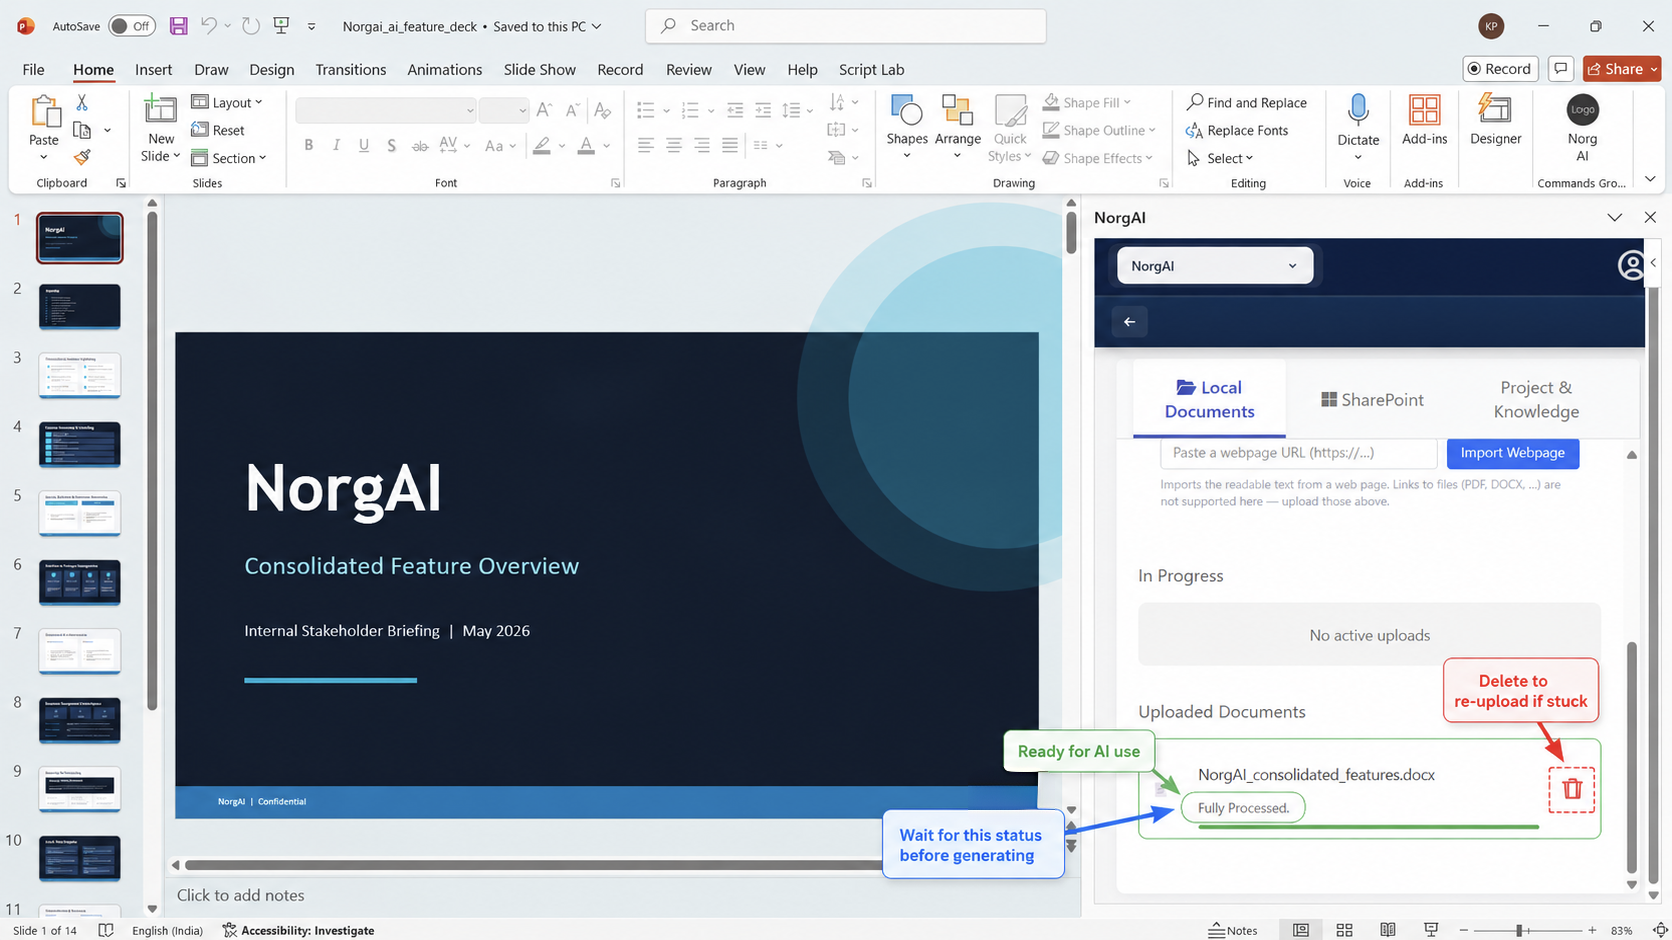
Wait for Fully Processed before submitting a generation request. Files still in Parsing or Indexing are not available to the AI and will be silently skipped. Most files complete within 30–90 seconds; large PDFs (100+ pages) may take up to 5 minutes.
Deleting a Document
Click the trash icon next to any file and confirm. Deleting a document removes it from the AI’s knowledge—future generations will not reference it. This does not affect previously generated slides.
Best Practices for Document Uploads
- Upload the actual RFP first —it is the primary source of scope, requirements and evaluation criteria.
- Include past proposals and case studies —they provide proven language and relevant examples.
- Upload one master deck —a reference PowerPoint NorgAI can use for slide structure and layout patterns.
- Remove outdated files —stale documents produce stale output.
- Name files clearly —NorgAI displays source filenames in citations, so descriptive names make output easier to trace.
6. Generating a Presentation
NorgAI can generate a complete presentation from scratch using the documents in your project.
How to Generate
- Ensure the relevant project is selected in the dropdown.
- Ensure key documents are Fully Processed .
- Type your generation request in the chat input at the bottom of the task pane and press Enter .
| Goal | Example prompt |
|---|---|
| Executive summary deck | “Create a 10-slide executive proposal for the uploaded digital transformation RFP. Audience is a logistics CFO.” |
| Sales pitch | “Generate a 7-slide pitch for our cloud migration solution tailored to mid-market financial services.” |
| Capability overview | “Create a capability presentation for a healthcare client covering our data platform offering.” |
| RFP response | “Build a proposal responding to the uploaded RFP. Include an executive summary, solution overview, implementation timeline and pricing approach.” |
What Happens Next
NorgAI analyses your project documents and the open presentation (if any), then presents a structured slide plan for your review before generating anything—see The Plan Review Workflow .
Tips for Effective Generation Prompts
- State the audience —a logistics CFO and a procurement manager need different language and emphasis.
- Specify slide count —“10 slides” is better than an open-ended request.
- Name the documents —“based on the uploaded RFP” is clearer than “based on what I uploaded”.
- State the goal —“win a competitive RFP” vs “brief an internal steering committee” produce very different decks.
7. Adapting an Existing Presentation
Use this workflow when you have an existing deck—a template, a past proposal or a master pitch—and want to transform it for a new client, industry or opportunity.
How to Adapt
- Open the presentation you want to adapt in PowerPoint.
- Select the relevant project in the NorgAI dropdown.
- Type your adaptation request, for example: “Adapt this deck into a proposal for Acme Corp, a mid-market logistics company. Use the uploaded case studies and RFP.”
How it Differs from Generation
| Generate | Adapt | |
|---|---|---|
| Starting point | Blank / topic only | Your open PowerPoint file |
| Slide structure | Created by AI | Based on your existing deck |
| Layout & design | From master deck | From your open file’s design |
| Use case | New engagements | Reusing existing IP |
8. The Plan Review Workflow
Before NorgAI makes any changes to your PowerPoint file, it proposes a structured slide plan that you must review and approve. NorgAI never modifies your file without explicit approval.
Reading the Plan
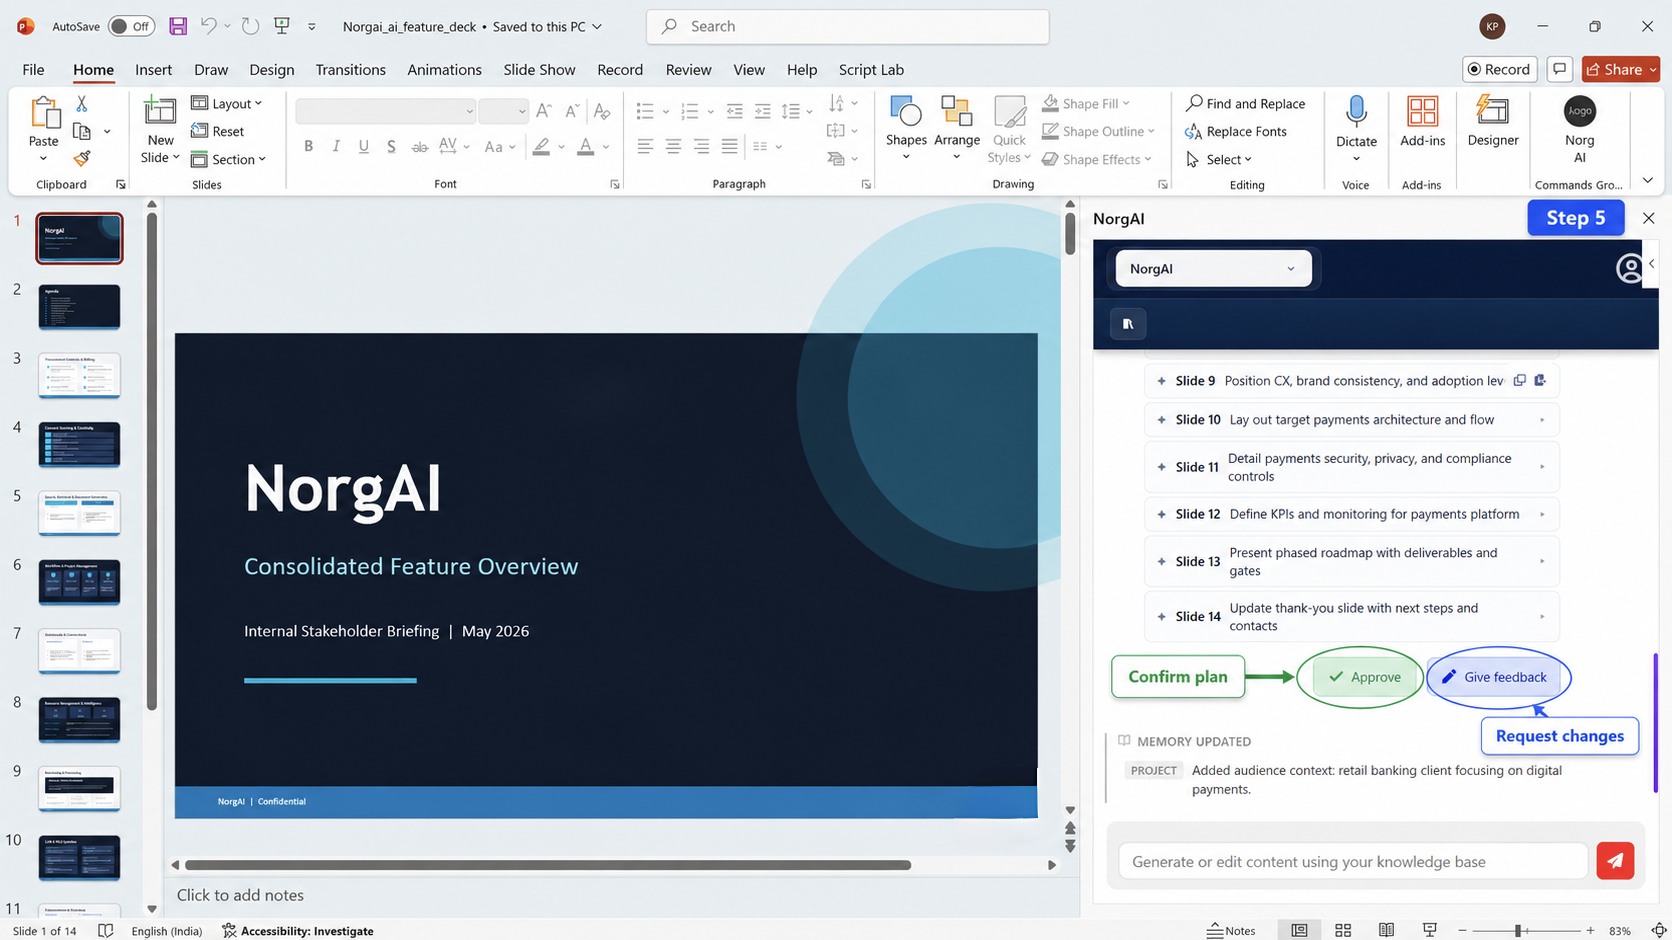
Each row shows the slide number, action type, proposed title and a content brief (expandable).
| Action | Meaning |
|---|---|
| NEW | A new slide is created from scratch using project documents |
| MODIFY | An existing slide in the open deck is updated with new content |
| KEEP | Slide is carried over unchanged |
| RESTYLE | Content restyled to match the reference deck’s layout without content changes |
| REMOVE | Slide is deleted from the output deck |
A summary line at the top shows the total count—for example: “12 slides (4 NEW · 6 MODIFY · 1 KEEP · 1 REMOVE)” .
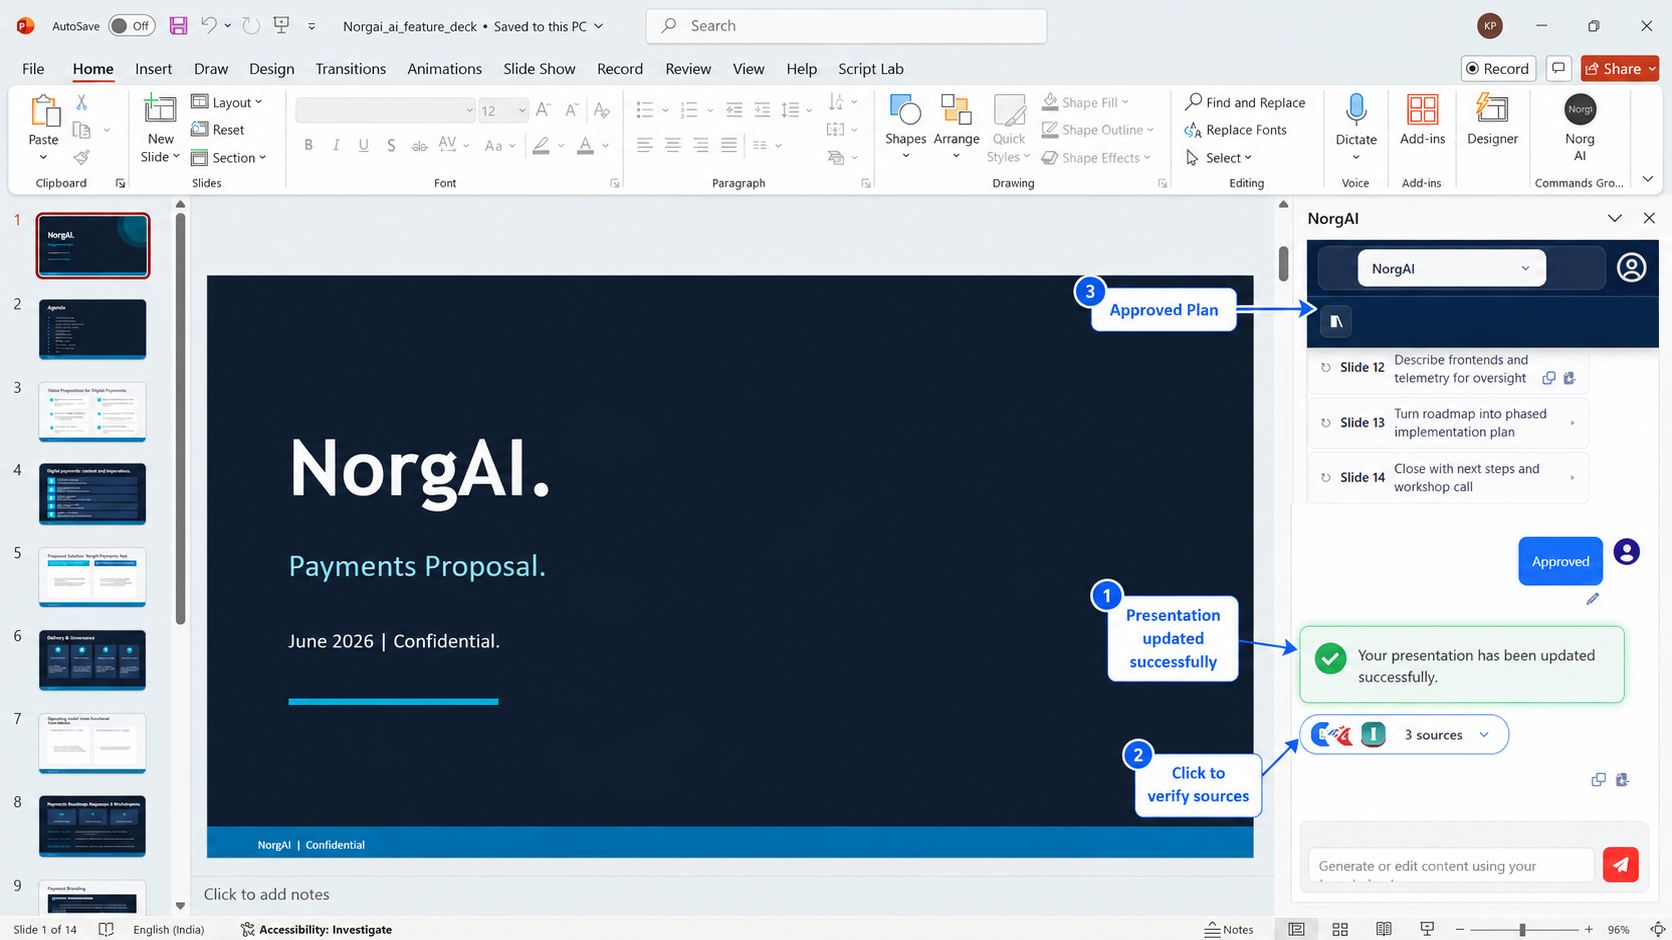
Approving the Plan
Click Approve to accept the plan. NorgAI immediately generates content and inserts slides into your open file, showing progress as each slide completes.
Once approved, the generation process cannot be interrupted. Use Ctrl+Z in PowerPoint to undo all inserted slides if you need to start over.
Giving Feedback
Click Give feedback to request changes before approving. Type your feedback in plain English—for example: “Remove the team bio slide and replace it with a client ROI slide.” NorgAI regenerates the plan incorporating your instruction, and the loop repeats as many times as needed without losing prior context.
Tip: Be specific about slide numbers. “Add a pricing slide after slide 7” is more reliable than “add a pricing slide somewhere in the middle”.
After Approval
9. Modifying Individual Slides
Use this workflow to update one or more specific slides without running a full adapt or generation cycle. It is faster and more surgical than the full plan workflow.
How to Modify
- Navigate to the slide you want to modify in PowerPoint.
- Type your modification instruction in the chat—for example: “Update this slide with the latest competitive data from the uploaded market report.”
- NorgAI generates a proposed updated slide and displays it as a slide card in the chat.
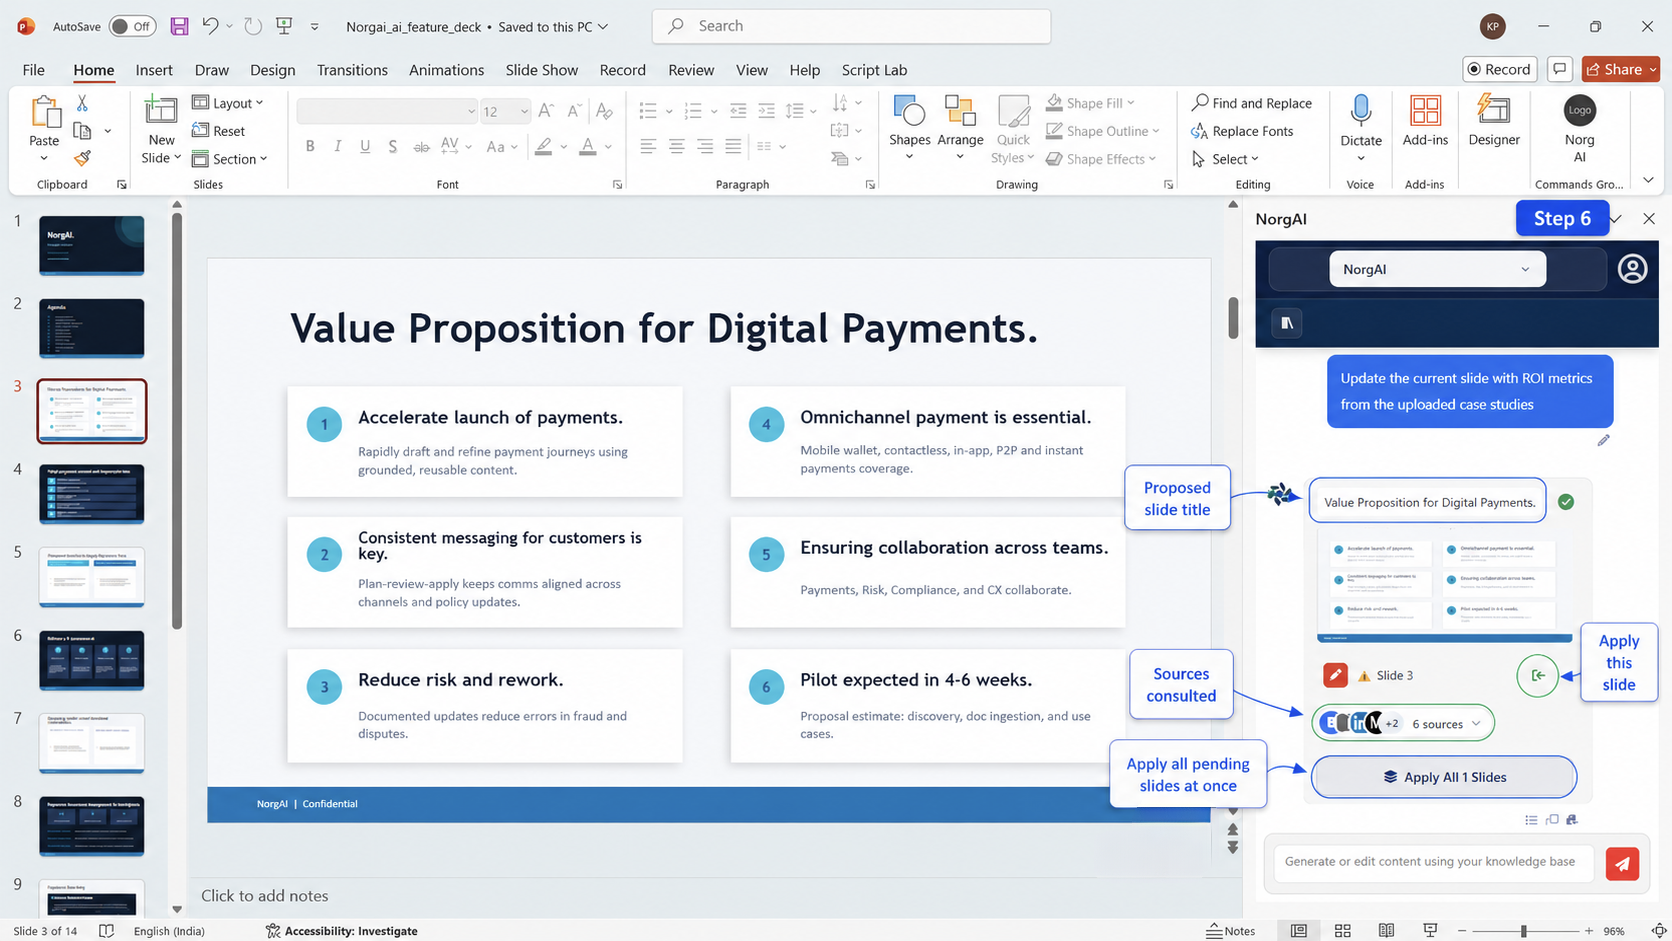
Applying Changes
- Click Apply on an individual slide card to replace that slide in your file.
- Click Apply All N Slides to apply all pending updates at once.
- Once applied, the Apply button changes to a checkmark confirming the slide has been written.
Use Ctrl+Z in PowerPoint immediately after applying to undo a slide insertion.
When to Use Modify vs Adapt
| Use Modify | Use Adapt |
|---|---|
| Updating 1–3 specific slides | Transforming an entire deck |
| Adding content to an existing slide | Changing the deck’s audience or purpose |
| Refreshing data on a single slide | Restructuring the narrative |
| Fixing a specific claim | Producing a new client version |
Confidence-Based Filtering (Trim / Expand)
NorgAI assigns each generated slide a relevance confidence score (high, medium or low) based on how well it matches the source documents. After generation you may see Trim and Expand controls:
- Trim —removes low-confidence slides, keeping only high and medium confidence content.
- Expand —restores trimmed slides or asks NorgAI to generate additional supporting slides.
10. Asking Questions About Your Documents
NorgAI is a search and Q&A tool as well as a generation tool. You can query your uploaded documents in plain English without triggering a slide generation workflow.
How to Ask Questions
Select the relevant project and type your question in the chat—for example: “What are the mandatory compliance requirements in the uploaded RFP?” NorgAI searches across all Fully Processed documents and returns a synthesised answer with source citations.
Conversational Follow-Up
NorgAI maintains context for the last 5 exchanges in the current session, so you can ask follow-up questions without restating context. Conversation history is in-memory and resets if you close and reopen the task pane.
11. Source Attribution
Every NorgAI response that draws on documents or web data includes a Sources panel—the primary mechanism for verifying AI outputs.
Sources Panel Structure
- Sources Used —documents and web pages directly cited in the output.
- Also Consulted —sources retrieved and evaluated but not directly cited (click the expand arrow to view).
Document and Web Sources
Each document source shows the filename, upload date, the extracted passage (click to expand the full excerpt) and the page or section reference. Each web source shows the website name and URL; click it to open the page in your browser.
When Web Search is Used
NorgAI supplements document search with web search when a request needs current information not in your documents, when uploaded documents are insufficient, or when you explicitly ask for current data. Web sources are always attributed and never treated as hidden inputs.
12. Knowledge & Memory
NorgAI learns from your interactions to improve future outputs. This is not passive—you can view, edit and delete everything NorgAI has learned.
How Knowledge is Created
NorgAI saves learned facts and preferences as knowledge entries scoped to either user-level (preferences across all your projects) or project-level (facts specific to a project, such as client name or budget constraints).
Knowledge Chips
After a response you may see knowledge chips showing what NorgAI learned—for example: “Client is a mid-market logistics company based in the UK.”
- If the information is correct, dismiss the chip—NorgAI retains the entry.
- If it is incorrect, click the × button to reject it—the entry is deleted and will not influence future outputs.
Always review knowledge chips after the first few exchanges in a new project—early corrections prevent compounding errors in later generations.
Viewing, Editing and Clearing Knowledge
Open the Documents icon → Project & Knowledge tab. Saved entries display as editable markdown; edit directly and click Save . To clear all knowledge for a project, delete the content in the knowledge editor and click Save—this resets the project’s AI memory without deleting documents or conversation history.
13. Project Collaboration
NorgAI projects are shareable. All project members access the same document library, AI knowledge and conversation history.
Adding and Removing Team Members
- Open the Documents icon → Project & Knowledge tab.
- Click Manage Members (or the members icon).
- Click Add Member , search by name or email, select the user and confirm.
To remove a member, click the remove icon next to their name and confirm—access is revoked immediately.
Shared Context
- All uploaded documents are available to all members.
- AI knowledge entries are shared—a fact one member confirms is visible to all.
- Conversation history is per-user—each member has their own chat thread within the project.
14. Troubleshooting
Add-in and Authentication
| Issue | Likely cause | Resolution |
|---|---|---|
| Login dialog does not open or opens blank | Pop-up blocked by browser or corporate security policy | Allow pop-ups for the NorgAI domain; in desktop PowerPoint, contact your IT administrator. |
| Login dialog opens but authentication fails | Incorrect credentials, locked account or SSO misconfiguration | Verify credentials with your IT administrator; clear browser cache in PowerPoint for Web. |
| Task pane shows a blank white screen | Add-in failed to load, or network error on startup | Close and reopen PowerPoint; if it persists, reinstall the add-in from AppSource. |
| “Host not supported” message on open | NorgAI opened in an unsupported Office application | NorgAI supports Microsoft PowerPoint only; open the add-in from within PowerPoint. |
Documents
| Issue | Likely cause | Resolution |
|---|---|---|
| File stuck at Parsing/Indexing for 5+ minutes | Large file, complex formatting or temporary backend delay | Wait up to 10 minutes for large PDFs; if unchanged, delete and re-upload. |
| File shows “Failed” or “Unable to Process Document” | Password-protected, corrupted or unsupported encoding | Remove password protection, re-save and re-upload, or convert to another supported format. |
| File uploaded but not used in generation | File not yet Fully Processed, or wrong project selected | Confirm Fully Processed status and that the correct project is selected. |
Generation and Plan
| Issue | Likely cause | Resolution |
|---|---|---|
| Plan shows unexpected REMOVE actions on important slides | AI is optimising for the stated audience | Click Give feedback and list slides to preserve: “Keep slides 2, 4 and 6 unchanged.” |
| Generated content does not use uploaded documents | Files still processing, or prompt lacked specificity | Wait for Fully Processed; rephrase to reference uploads explicitly (“using the uploaded RFP”). |
| Apply All Slides fails with an error | Network interruption during slide insertion | Click Apply All again, or apply slides individually using each card’s Apply button. |
15. FAQ
What happens if I close PowerPoint while a generation is running?
Closing PowerPoint interrupts generation. Partially generated slides may have been inserted—use Ctrl+Z to remove them and retry.
Can I use NorgAI without an open presentation?
Yes, for document Q&A and conversational requests. Slide generation and modification require an open presentation.
How many projects can I create?
There is no hard limit. Contact your administrator for storage limits specific to your plan.
Why does the task pane say “Trial Mode”?
Your administrator has configured the add-in in Trial mode; some features may be restricted. Contact your account representative to upgrade.
Can I rename a project?
Not in the current version. Create a new project with the correct name and re-upload your documents.
Does NorgAI support languages other than English?
NorgAI can process and generate content in multiple languages; quality in non-English languages depends on the model and your source documents. English is the primary supported language.
16. Privacy & Data Handling
| Data type | Storage | Retention |
|---|---|---|
| Uploaded documents | Stored securely, scoped to your project | Until you delete them |
| Open presentation content | Sent for processing during operations | Not stored after the operation completes |
| AI knowledge entries | Stored per-user and per-project | Until you delete them |
| Authentication tokens | Stored in browser localStorage | Until session expiry or logout |
| Passwords | Never stored by NorgAI | — |
- Authentication: NorgAI uses OAuth 2.0 / OIDC via your organisation’s identity provider and does not store passwords.
- Data access: Uploaded documents are accessible only to project members; no document content is shared across organisations.
- AI model: Content is processed by a large language model. See the Privacy Policy for data handling, retention and model-training policies.
Full privacy policy: inscripta.ai/legal/privacy
17. Support & Contact
| Product website | inscripta.ai/products/norgai |
| Quick Start Guide | inscripta.ai/products/norgai/quick-start |
| Support & contact | inscripta.ai/#contact |
| Support email | sales@inscripta.ai |
| Privacy policy | inscripta.ai/legal/privacy |
| Terms of use | inscripta.ai/legal/norgai-terms |
For enterprise licensing, deployment configuration and administrator setup, contact your Inscripta AI account representative through the support page above.
NorgAI is developed and maintained by Inscripta AI Technologies Private Limited. Version 1.0.
Back to Quick Start Guide